Broken Pillar (Modeling & Texturing)
In this exerpt from the Blender Secrets e-book, we'll turn the default cube into a realistic textured broken pillar mostly by using modifiers and textures. Start of by not deleting the Default Cube!
Open a UV Editor window so you can see the UV layout of the Default Cube. Like most primitive objects, the cube already has a UV layout that you can see when selecting all in Edit Mode.
However we will create a more convenient UV layout that we can update as we change the shape of the model. In Edit Mode, select all by pressing A and stretch the cube out by pressing S+Z and moving the mouse to make the cube more like a pillar. Press A again to deselect everything.
While still in Edit Mode, press 2 for Edge Selection mode and select only the edges of the top and bottom plane. Press U then choose Mark Seams. Now select one vertical edge of the cube and mark it as a seam as well.
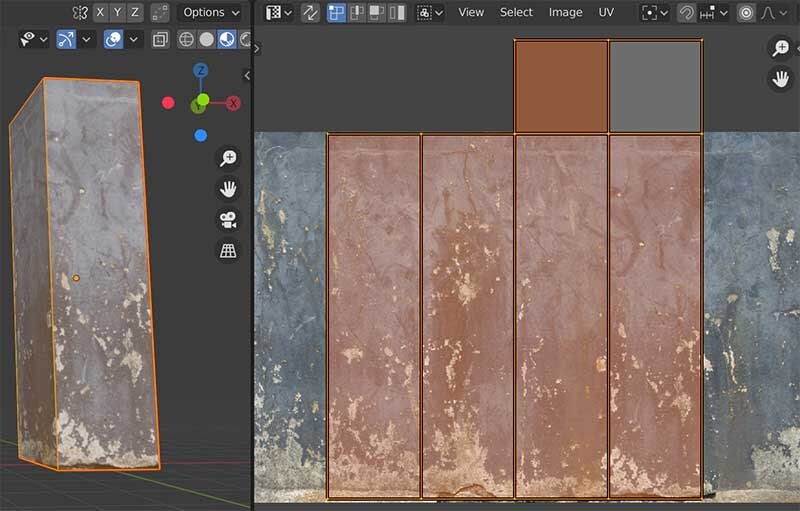
Press A to select all and press U then choose Unwrap (or press U twice). You should get something like this in the UV Editor window:
Now we are going to give it a texture. Photographic textures are a great short-cut to achieving photorealism. Go to Textures.com (or a different website of your choice) and click on the category "Concrete". There are further subcategories like "Worn Paint" for example. I like the texture called "ConcreteWornPaint0112". You can download the small version for free. It's only 1024x512 pixels, but that's fine for this background model.
Download the texture and place it in a "Textures" subfolder of the folder in which you save your Blend file. That way you don't need to search for your textures later. It also prevents issues when using render farms, which expect this kind of folder hierachy (If you place the textures in a different folder above the one with your Blend file, it won't cause issues on your computer but it probably will on a renderfarm).
Add the texture to the material of the pillar and name it "Pillar_Mat" or something clear like that. You will need to switch to Material view to see the texture in the viewport.
(Note that I've simplified the nodes in the picture below by selecting them and pressing Ctrl+H - this is only for the purpose of making them fit the screenshots, you don't need to do this).
We may have to rotate and scale the UV's to fit the part of the texture that we want to use. In some cases like with this rectangular texture, you need to unwrap the object again so the aspect ratio is correct.
You can select the vertices in the UV layout window and rotate them incrementally by pressing R and holding Ctrl. Or you can press R and 90 for example, to rotate them 90 degrees. Press S to scale the UV's. Transform the UV's until you get this kind of effect where the most damage to the pillar seems to be at the bottom.
In Edit Mode, add some more horizontal Edge Loops with Ctrl+R and then Subdivide the pillar a couple of times to add some more geometry. This comes in handy when using booleans later.
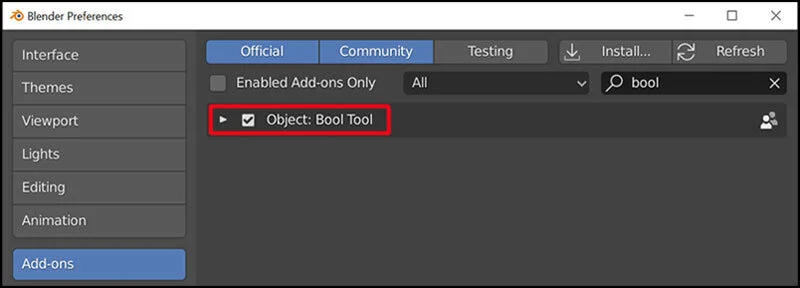
With the main pillar created, it's time to add some damage. This will be done using the Bool Tool add-on which comes with Blender by default. You just have to enable it in Preferences.
Create a UV Sphere from the Add menu and set it to Shade Smooth.
Give the Sphere a Displacement modifier with a procedural Cloud texture. Experiment with the Strength value. Add a Subdivision modifier before the Displacement modifier to get more detail. This is the object which will take a "bite" out of our pillar. If you want to scale the Sphere along the Z-axis for example, it's best to do so in Edit Mode.
Download another texture, this time a rough concrete that will represent the damages parts of the pillar. Add a material to the sphere and use the texture as the Base Color. I used the texture "ConcreteFloorsDamaged0025" from Textures.com.
Name this material "Damaged_Mat" for ease of use. Add this material to the pillar as well (as a second material) by clicking on the + icon and selecting it. This is necessary for the pillars to show an "inner" material after the Boolean operations.
Move the UV Sphere so it overlaps somewhat with the pillar and with the Sphere selected, hold Shift and select the pillar as well. Then press Ctrl + minus on the keypad. The sphere will turn into a Bounding Box and the pillar will have a chunk bitten out of it.
If it happens that you see the seam of the texture in the cut out parts, simply rotate the bounding box along the Z-axis until the seam is gone.
Now let's add some rusted metal rebar. These are the metal cylinders that reinforce concrete pillars. Add a Cylinder and set Cap Fill Type to Nothing. Vertices can be set to 8.
Scale it along the Z-axis to almost the length of the pillar. Press Ctrl+R and scroll the mouse wheel up to add some edge loops, which are necessary for the next step. In Object Mode set it to Shade Smooth.
To create the material for the rebar, download a rust texture. I used "RustMixed0042" from Textures.com.
Rebar has this specific kind of look where it has a kind of thread running along its length. We can add some nodes to the material to create this. Mainly we'll use a Wave Texture to create a black-and-white displacement map. Using a Displacement node, we can use the Wave texture to create actual displacement on the model.
In the Material Settings, turn on Displacement Only as the type of Displacement (please note: this option is only visible with Cycles set as the render engine).
In Edit Mode, select all and duplicate the rebar a few times with Shift+D and move the duplicates with Shift+Z (this means you can move it along all axis except the Z-axis).
Turn on Proportional Editing and check "Connected Only". This checkbox allows us to edit the individual cylinders. Move them to make them look more bent and destroyed.
This is the basic workflow for creating the damaged concrete pillars with rusted rebar sticking out of them. To create some variations, you can simply duplicate them including the boolean cutter objects, and move those around to remove chunks of the pillar at different locations.
To make these more low poly you can apply the modifiers and then add a Decimate modifier to it. The fastest way to apply all modifiers is to select the pillar, press F3 and search for "convert to", then choose "Mesh". After that all the modifiers have been collapsed and you can add the Decimate modifier to make the model smaller.
Did you find this tutorial interesting? The full Blender Secrets e-book contains 1023 pages of tips and tricks like this. You can get it from Gumroad or Blender Market. Or you can get a free sample e-book here if you want.


