Create a mysterious city with Blender and fSpy
Below is the first part of a written tutorial about creating a city with some dramatic lighting and haze, in Blender (and using the free fSpy add-on). To watch the video, click here. And to read the entire thing on Teachable, click here.
I had the opportunity to take some photographs from the Tokyo Metropolitan Building, which are useful for this tutorial. You can download these photos here. Let’s turn one of these photos into a dark, mysterious and dystopian 3D landscape and render a short animation.
To do this we’ll use fSpy, which is both a free stand-alone app and a free Blender add-on. You’ll need the app to create the fSpy files, and the add-on to import them in Blender.
I’ve noticed from the comments on older tutorials about this topic, that a lot of people download the wrong version of fSpy and therefore think it no longer works. So please make sure you use the links for the correct versions, found below.
Download fSpy stand-alone app:
https://github.com/stuffmatic/fSpy/releases/tag/v1.0.3
Download fSpy add-on:
https://github.com/stuffmatic/fSpy-Blender/releases/tag/v1.0.3
To get started, download the fspy setup file, fspy-setup.1.0.3.exe, from Github.
Then click on the downloaded file to install it.
Below you see the interface of the stand-alone fSpy app. In this window, you can drag and drop a photo to get started (more in that later). It’s a pretty simple app to use.
You’ll also need to download the Blender fSpy add-on, version 1.0.3.
Without this add-on you won’t be able to import the files made in the fSpy app into Blender.
Download the ZIP-file, but don’t unzip it! This goes for most blender add-ons that you download from the web.
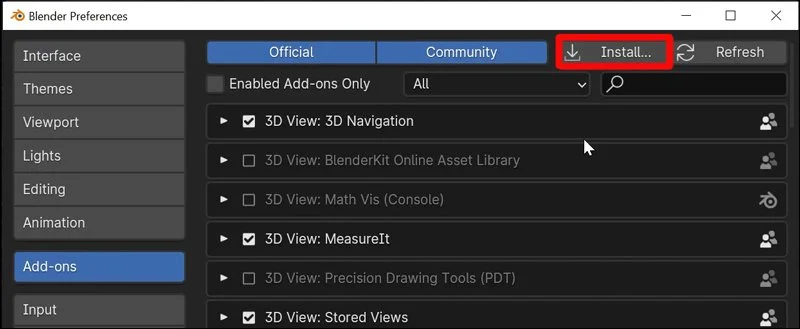
In Blender, go to Preferences and install the add-on. Click on Install and select the downloaded ZIP file.
And finally enable it. You may have to search for it in the add-ons list.
Drag and drop a photograph into the stand-alone fSpy app.
We can enable a 3D guide in the shape of a box. You can move this cube around to check if the perspective lines up with the photo. At first it won’t line up, so we’ll have to adjust the vanishing points.
I would like to have the X, Y and Z-axes in fSpy point in the same direction as in Blender.
That way we won’t end up with some weirdly oriented upside down scene in Blender. For reference, you can see the axis in the Navigation Gizmo in Blender.
To make the axes in fSpy correspond to those in Blender, we will need to change the vanishing point axes. To y and -x in this specific case (this depends on your photo, you’ll need to experiment).
As you can see, now they match those in Blender.
Now we can start aligning the vanishing points, by clicking on and then dragging their end points.
By holding Shift, you can zoom in to more precisely place them. It looks a bit like you’re looking through a sniper rifle scope...
In this case, I’m using the building in front as reference as it has some clear perspective lines.
We can test if the perspective of the 3D guide cube matches the buildings. It seems to be almost perfect. But not quite, as the Z-axis still seems to be a little different than the vertical edge of the building.
I think we can improve it by using a building further away as reference for this vanishing point. Now it seems to align even better. The next step is to save this file.
This file can then be imported in Blender.
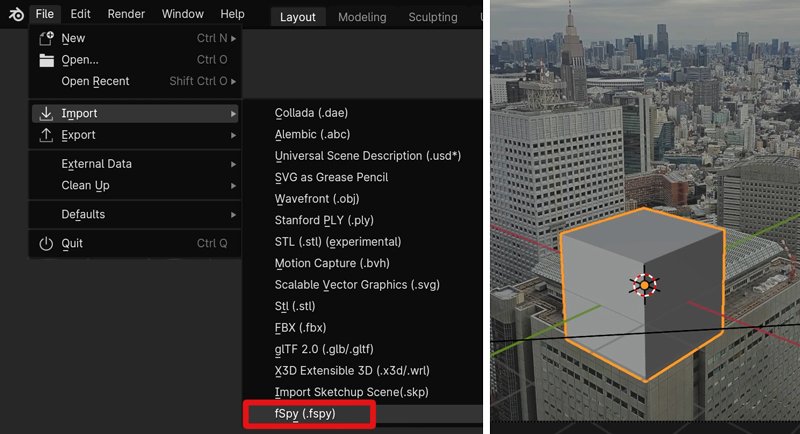
Because we installed the fSpy add-on, we now have an fSpy import option. I’ll import the file I just saved from the stand-alone app by going to File > Import > fSpy and choosing the correct file.
This file contains the photograph as well as a camera. And as you can see, from the Camera view, the Cube aligns to the perspective of the photo. Press 0 on the Numpad to enter Camera view, in case you exit it by accident.
It’s a good idea to save this .blend-file at this point.
We still have the original Camera from the default Blender scene, which we don’t need. So select that one and just delete it.
As you can see the imported Camera has the name of the fSpy project, “Tokyo01.fspy”. I’ll turn on X-Ray mode so I can see the buildings in the photograph through the mesh. This will make modeling easier.
And in Edit Mode I’ll delete the bottom Face as it won’t be visible. Now it’s just a matter of moving Vertices, to match the buildings in the photo.
By holding Alt and clicking, we can select all these bottom Edges and move them down.
To move things along just one axis, press for example G and Z to move it along the Z-axis. Or G and Y to move along the Y-axis… or G and X to move along the X-axis.
...it's not finished yet - there are 21 more pages!
You can read them on Teachable or in the full e-book. In the rest of the topic, we explore how to set up the Camera animation, how to set up interesting lighting, and then render the animation. Click here to go directly to this topic. Or you can watch the video on YouTube.


